Thu, Aug 24, 2017
Mattermost comes with a number of built-in slash commands, such as /join to join a channel, or /away to set your status to away. It also supports Slack-compatible custom slash commands. These offer a simple way to add custom commands that help to make your team’s workflow fast, efficient and enjoyable.
Custom slash commands are actually very easy to build. You just need to set up an HTTP endpoint which will receive the command payload, processes it and respond with the message which will be posted. Then add the custom slash command to the server and point it at your HTTP endpoint and you are done.
The only inconvenient part of building a custom slash command is making the HTTP endpoint available. The obvious way to solve this is to set up a webserver somewhere to host it, but this is a lot of overhead for an endpoint which might only triggered a few times a day. However, this is somewhere where serverless execution environments like AWS Lambda really shine, making it simple to set up, without needing a web server, and costing a few fractions of nothing for a lightly used endpoint.
In this post, we will walk through setting up a Mattermost Custom Slash Command hosted as an AWS Lambda function in combination with an AWS API Gateway endpoint.
The Lambda function we write is going to be written in Python 3, although you can use any of the other supported languages if you prefer. As an example, we’re going to use the /standup command the Mattermost Core Team use to post our progress update in our channels each day. If you’d like to see what this command looks like now, jump ahead to the [See it in Action] section below.
Setup in AWS
We’ll start by setting up the Lambda function and API Gateway endpoint in AWS.
- Log in to the AWS console and go to the Lambda section, and click on Create a Lambda function.
- On the Select blueprint page, click the Author from Scratch button.
- On the next screen, select API Gateway as the trigger.
- Fill in the new set of settings which appear:
- Pick an API Name (e.g.
MattermostSlashCommands)
- You can leave the deployment stage as
prod.
- Select Open for the security. This means your API can be invoked over HTTP without any credentials.
- On the next page, fill in these settings too:
- Provide a name for your function. We’ll use
SlashStandup.
- Choose Python 3.6 for the runtime.
- Select Edit code inline.
- For the function code, copy paste the code in the [Implementing our Slash Command] section.
- For the Lambda Function Handler, create a new role from template, and give it a name, e.g. runLambdaFunctionsRole.
- For RAM and Timeout, select
128mb and 30s respectively.
- Advance to the review page, and click Create Function.
- On the success page, you should see the URL for your new API endpoint.
Implementing our Slash Command
The full Python 3.6 code for the /standup Custom Slash Command is as follows:
from datetime import datetime
from urllib.parse import parse_qsl

import json

def parse_input(data):
    parsed = parse_qsl(data, keep_blank_values=True)
    result = {}
    for item in parsed:
        result[item[0]] = item[1]
    return result

def lambda_handler(event, context):
    # Parse the request
    try:
        request_data = parse_input(event["body"])
    except:
        return {
            "statusCode": 400,
            "headers": {"Content-Type": "application/json"},
            "body": "{}",
        }

    # Check the token matches.
    if request_data.get("token", "") != "YOUR MATTERMOST SLASH COMMAND TOKEN":
        return {
            "statusCode": 401,
            "headers": {"Content-Type": "application/json"},
            "body": "{}",
        }

    # Build the response message text.
    text = "##### Status Update for {}\n\n{}\n\n#standup-{} #standup".format(
            datetime.strftime(datetime.now(), "%A %-d %B %Y"),
            request_data["text"],
            datetime.strftime(datetime.now(), "%Y%m%d"),
    )

    # Build the response object.
    response = {
        "response_type": "in_channel",
        "text": text,
    }

    # Return the response as JSON
    return {
        "body": json.dumps(response),
        "headers": {"Content-Type": "application/json"},
        "statusCode": 200,
    }
Let’s go through this bit-by-bit, looking at how it works:
def parse_input(data):
    parsed = parse_qsl(data, keep_blank_values=True)
    result = {}
    for item in parsed:
        result[item[0]] = item[1]
    return result
The parse_input() function parses the form-encoded data sent by Mattermost in the POST body when it calls our API endpoint into a dict for easy access to the parameters that have been passed.
    # Parse the request
    try:
        request_data = parse_input(event["body"])
    except:
        return {
            "statusCode": 400,
            "headers": {"Content-Type": "application/json"},
            "body": "{}",
        }
Before we do anything else, we parse the payload we were sent by the Mattermost server. If this fails, we return a HTTP Bad Request response.
    # Check the token matches.
    if request_data.get("token", "") != "YOUR MATTERMOST SLASH COMMAND TOKEN":
        return {
            "statusCode": 401,
            "headers": {"Content-Type": "application/json"},
            "body": "{}",
        }
Next, we check that the token parameter in the request payload matches the one we have hardcoded in the code. By hardcoding the token provided by Mattermost when setting up the custom slash command, we can ensure that our API endpoint rejects any requests that do not come from our Mattermost server, returning a HTTP Unauthorized response in this case.
    # Build the response message text.
    text = "##### Status Update for {}\n\n{}\n\n#standup-{} #standup".format(
            datetime.strftime(datetime.now(), "%A %-d %B %Y"),
            request_data["text"],
            datetime.strftime(datetime.now(), "%Y%m%d"),
    )
Now we have the payload of the request, and have ensured the request is coming from our Mattermost server, we can construct the text of the response message.
    # Build the response object.
    response = {
        "response_type": "in_channel",
        "text": text,
    }

    # Return the response as JSON
    return {
        "body": json.dumps(response),
        "headers": {"Content-Type": "application/json"},
        "statusCode": 200,
    }
Finally, we build the response object to send back to the Mattermost server in the JSON format it expects, setting the response_type to in_channel so the message appears in the channel for everyone to see. Then we dump it to a string and return the response object for API Gateway to process and return to our Mattermost server.
Configuring Mattermost
The final part of the process is to add a new Custom Slash Command in Mattermost. Depending on the policy settings on your Mattermost server, you might need to be a System or Team Administrator to do this.
- In the Mattermost web app main menu, select Integrations, then Slash Command then Add Slash Command.
- Fill in the form as per the screenshot below (making any changes you would like). The most important are:
- The Command Trigger Word which dictates what
/word you use to trigger invoke the slash command.
- The Request URL, which should be the URL for the API endpoint on AWS API Gateway/Lambda we created earlier.
- The Request Method, which should be
POST.

Once that form is filled in, click Add and you you will see the Token for the slash command. Use this in the Lambda function code described earlier to ensure that only your Mattermost server can call the lambda function.
See it in Action
We’ve built the Slash command on AWS, and added it in Mattermost. Now all that remains is to try it out.
Start by typing /standup into the message box of Mattermost:
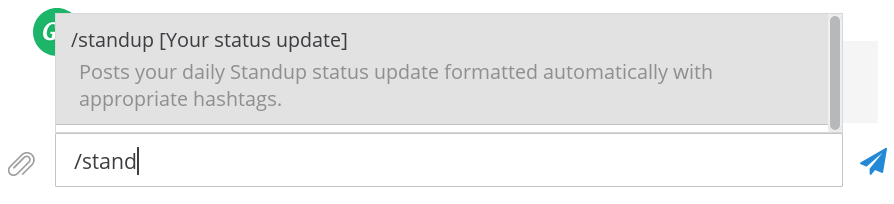
Finish typing the command name, or click on the autocomplete suggestion to finish it for you. Then type in the rest of your status update:
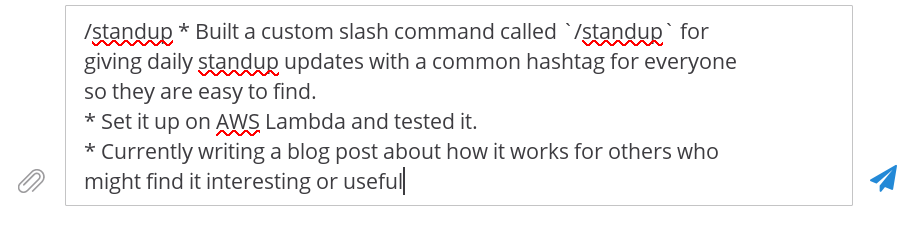
When you are done, press return, and if everything is set up correctly, you’ll see your status update post appear in the channel:
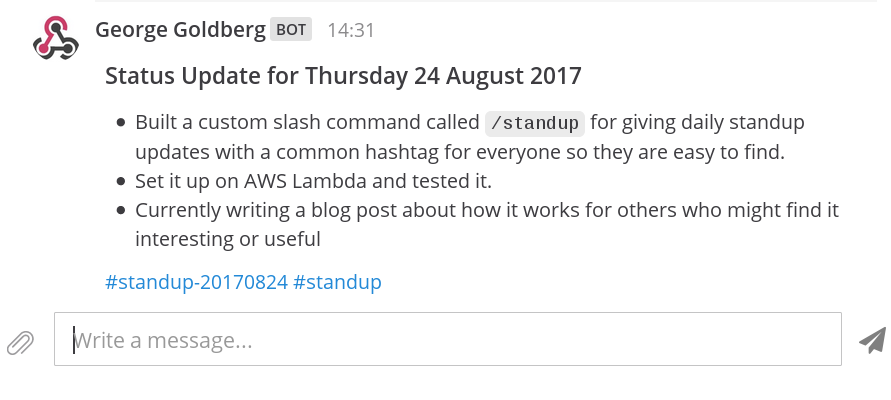
And that’s it really. You can customise the slash command to do whatever you want by changing this code. You can see a list of parameters that are sent by the Mattermost server when calling your API endpoint as well as a list of parameters it accepts in the response for more inspiration in the Mattermost custom slash command documentation.
Tue, May 2, 2017
Mattermost is a large web app written in ReactJS. It currently consists of a little over 300 components, built using a “Flux-like” architecture. This makes unit testing of components particularly challenging as the vast majority of them call methods on the stores directly. Of course, it’s possible to mock out the stores in every
test, but it’s not really practical to do this.
If that was the end of the story, it would be a very boring one indeed. Fortunately, we are in the process of changing the underlying architecture of the Mattermost web app. After testing out Redux as the core of our new React Native powered mobile apps, we’ve decided to move over to the same architecture in our web app. I’ll leave writing about the details of how that migration is happening to someone else, and instead focus on the impact of this on component testing.
As part of the transition to Redux, our component structure is changing. Instead of accessing stores from any component whenever some store data is needed, components will now be logically grouped into hierarchies of pure, UI components, receiving all their data through their props, with store access limited to a single “controller” UI-less component acting as the parent to each group of UI components.
This change of architecture brings a major benefit for component testing: UI components no longer have complicated side effects, extensive dependency chains, or direct access to data sources. Instead, there is a single API onto each component, described by its props field. This makes unit testing each component in isolation a trivial task.
From the point of view of the application as a whole, having well defined API contracts that are extensively unit tested eases the reuse of components (and reduces the appeal of copy-paste code blocks being littered throughout the code base - something that currently happens rather more often than we’d ideally like). It also provides a structure and set of expectations around the behaviour of components, which reduces the need to examine the internals of every child component (and grandchild…ad infinitum) to investigate bugs or make simple feature changes to a component, as is often the case in our current code base.
Jest and Enzyme
Mattermost uses Jest to run the web app tests, in combination with Enzyme. The combination of these two utilities gives us a very simple workflow for component testing. Enzyme allows us to render and interact with React components in isolation, and Jest allows us to perform snapshot testing against these components - allowing us to detect any changes in rendered output of components and, where such a change is intended, automatically update the test snapshots. The integration between these two utilities is provided by the enzyme-to-json library.
I won’t get into the details of how we set up the plumbing for these libraries - plenty of other people have written about it (e.g. here), and the only differences between what they and I have done are specific to the Mattermost codebase. If you are interested, you can have a look through the Mattermost web app source code.
The Tests
To recap for a moment: the purpose of the component tests we are building is to verify the API contract of the UI components, expressed in terms of their props. However, since we don’t yet live in a perfect world of 100% pure components, where practical we also want to test any known side-effects of global state on them.
Let’s consider two example components. The first is the BackstageHeader component (full source code here), chosen for its extreme simplicity, and the fact it is already a pure component. The render method is shown here:
render() {
    const children = [];

    React.Children.forEach(this.props.children, (child, index) => {
        if (index !== 0) {
            children.push(
                <span
                    key={'divider' + index}
                    className='backstage-header__divider'
                >
                    <i className='fa fa-angle-right'/>
                </span>
            );
        }

        children.push(child);
    });

    return (
        <div className='backstage-header'>
            <h1>
                {children}
            </h1>
        </div>
    );
}
And the props:
static get propTypes() {
    return {
        children: React.PropTypes.node
    };
}
This is a very simple component - it just builds a header based on the single, optional children prop, containing a list of child objects to insert into the header.
Shallow Rendering
The component tests we are building are unit tests, so we would like to limit the testing to individual components, and avoid changes in components elsewhere in the hierarchy affecting these tests. Enzyme provides a very useful tool for this: shallow rendering. Shallow rendering allows us to render just this component, but not any of it’s child components, allowing it to be tested entirely in isolation.
test('should match snapshot without children', () => {
    const wrapper = shallow(
        <BackstageHeader/>
    );
    expect(wrapper).toMatchSnapshot();
});
This first, very simple test shallow-renders the BackstageHeader component, and makes use of Jest’s built in snapshot testing capability to compare the rendered component with a known-good snapshot (more on that in the next section). As the children prop is optional, we test the component initially without any children to ensure it behaves properly.
The only other test we need here is one with the children prop set:
test('should match snapshot with children', () => {
    const wrapper = shallow(
        <BackstageHeader>
            <div>{'Child 1'}</div>
            <div>{'Child 2'}</div>
        </BackstageHeader>
    );
    expect(wrapper).toMatchSnapshot();
});
That’s it for this very simple component. You can see the BackstageHeader test suite in full here.
Running Tests
If you are adding or modifying existing component tests, you can run jest in “watch” mode like this:
user@host webapp$ npm run test:watch
This will run all tests that have been modified, and then continue to watch for further modifications, re-running tests as necessary. On the first run with new tests, it’ll generate the test snapshots, placing them in the __snapshots__ directory inside the directory where the test suite is located. You’ll then see output like this:
No tests found related to files changed since last commit.
Press `a` to run all tests, or run Jest with `--watchAll`.

Watch Usage
 › Press a to run all tests.
 › Press p to filter by a filename regex pattern.
 › Press t to filter by a test name regex pattern.
 › Press q to quit watch mode.
 › Press Enter to trigger a test run.
For the BackstageHeader test, let’s take a look at the snapshot that has been generated:
// Jest Snapshot v1, https://goo.gl/fbAQLP

exports[`components/backstage/components/BackstageHeader should match snapshot with children 1`] = `
<div
  className="backstage-header"
>
  <h1>
    <div>
      Child 1
    </div>
    <span
      className="backstage-header__divider"
    >
      <i
        className="fa fa-angle-right"
      />
    </span>
    <div>
      Child 2
    </div>
  </h1>
</div>
`;

exports[`components/backstage/components/BackstageHeader should match snapshot without children 1`] = `
<div
  className="backstage-header"
>
  <h1 />
</div>
`;
We can see that this contains the rendered output for both test cases shown above. You won’t ever need to manually edit this file - Jest will take care of that for you, as we are about to find out.
Let’s make a change to the BackstageHeader component. Instead of using the FontAwesome right-angle-bracket between each header item, let’s use the left-angle-bracket instead. We change the relevant line in backstage_header.jsx from <i className='fa fa-angle-right'/> to <i className='fa fa-angle-left'/>. Switching back to the shell where we ran the tests in watch mode previously, we see the following output:
 FAIL  tests/components/backstage/components/backstage_header.test.jsx
  ● components/backstage/components/BackstageHeader › should match snapshot with children

    expect(value).toMatchSnapshot()

    Received value does not match stored snapshot 1.

    - Snapshot
    + Received

    @@ -7,11 +7,11 @@
         </div>
         <span
           className="backstage-header__divider"
         >
           <i
    -        className="fa fa-angle-right"
    +        className="fa fa-angle-left"
           />
         </span>
         <div>
           Child 2
         </div>

      at Object.<anonymous> (tests/components/backstage/components/backstage_header.test.jsx:24:25)
      at process._tickCallback (internal/process/next_tick.js:109:7)

  components/backstage/components/BackstageHeader
    ✓ should match snapshot without children (3ms)
    ✕ should match snapshot with children (5ms)

Snapshot Summary
 › 1 snapshot test failed in 1 test suite. Inspect your code changes or press `u` to update them.

Test Suites: 1 failed, 1 total
Tests:       1 failed, 1 passed, 2 total
Snapshots:   1 failed, 1 passed, 2 total
Time:        1.896s
Ran all test suites related to changed files.

Watch Usage
 › Press a to run all tests.
 › Press u to update failing snapshots.
 › Press p to filter by a filename regex pattern.
 › Press t to filter by a test name regex pattern.
 › Press q to quit watch mode.
 › Press Enter to trigger a test run.
In that output, you can see that one of the test cases has passed, but the other has failed, due to the change to the symbol displayed between the child components. Helpfully, a diff of the rendered output is displayed. By looking at the diff, we can see that the test case failing is due to our intentional change to BackstageHeader, so we should update the test snapshot, rather than fix a bug which the tests have brought to light. We can do this simply by pressing the letter u. Once this has completed, we see the following output indicating that the tests are now passing once more:
PASS  tests/components/backstage/components/backstage_header.test.jsx
  components/backstage/components/BackstageHeader
    ✓ should match snapshot without children (4ms)
    ✓ should match snapshot with children (3ms)

Snapshot Summary
 › 1 snapshot updated in 1 test suite.

Test Suites: 1 passed, 1 total
Tests:       2 passed, 2 total
Snapshots:   1 updated, 1 passed, 2 total
Time:        0.528s, estimated 2s
Ran all test suites related to changed files.

Watch Usage
 › Press a to run all tests.
 › Press p to filter by a filename regex pattern.
 › Press t to filter by a test name regex pattern.
 › Press q to quit watch mode.
 › Press Enter to trigger a test run.
The contents of the __snapshots__ directories are an essential part of the test suite. Be sure to always run the full test suite to generate them after adding or modifying any components or test code, and to include them in your git commits.
Global State
The BackstageHeader component is a very simple, pure component. But how about a more complex component? For this second example, we will use the AboutBuildModal component. The source code for this component is too long to reproduce in full, but can be seen here. The props it expects are as follows:
AboutBuildModal.propTypes = {
    show: React.PropTypes.bool.isRequired,
    onModalDismissed: React.PropTypes.func.isRequired
};
Testing how it renders with show set to true and false respectively would be simple enough, but by examining the source code of the component, we see that it also renders differently depending on some global state. In order to test this, we need test cases covering the full range of global state which can have an effect on how it renders. One example is shown below:
test('should show the build number if it is the different from the version number', () => {
    global.window.mm_config = {
        BuildEnterpriseReady: 'false',
        Version: '3.6.0',
        BuildNumber: '3.6.2',
        SQLDriverName: 'Postgres',
        BuildHash: 'abcdef1234567890',
        BuildDate: '21 January 2017'
    };

    global.window.mm_license = null;

    const wrapper = shallow(
        <AboutBuildModal
            show={true}
            onModalDismissed={null}
        />
    );
    expect(wrapper.find('#versionString').text()).toBe(' 3.6.0\u00a0 (3.6.2)');
});
That’s just one of the test cases needed to ensure the different ways in which the component can render are all covered. The full test suite for the AboutBuildModal can be seen here.
Mounting Components
Continuing with the AboutBuildModal, there’s one other prop we want to test: the onModalDismissed callback. This should be triggered when the Modal component within the AboutBuildModal is hidden. In order to interact with the full component hierarchy within the AboutBuildModal, we need to do a full render, or “mount”, rather than a shallow render as we’ve been using previously. We can then use the find() method on the wrapper to locate the inner component and trigger it as if it has been hidden by the user, to test if our onModalDismissed prop is correctly called.
test('should call onModalDismissed callback when the modal is hidden', (done) => {
    global.window.mm_config = {
        BuildEnterpriseReady: 'false',
        Version: '3.6.0',
        BuildNumber: '3.6.2',
        SQLDriverName: 'Postgres',
        BuildHash: 'abcdef1234567890',
        BuildDate: '21 January 2017'
    };

    global.window.mm_license = null;

    function onHide() {
        done();
    }

    const wrapper = mountWithIntl(
        <AboutBuildModal
            show={true}
            onModalDismissed={onHide}
        />
    );
    wrapper.find(Modal).first().props().onHide();
});
React i18n Test Helper
If you were looking closely, you might have noticed that we used a function called mountWithIntl() in the previous test case. This is a custom function that wraps the mount() function provided by enzyme, in order to inject the props needed for React i18n support to work. Whenever you are shallow rendering or mounting a component which will result in the rendering of localised strings, you should use the appropriate wrapper functions to ensure they work correctly. The code is very simple and shown below (you can see it in the Mattermost source tree here).
import {mount, shallow} from 'enzyme';
import React from 'react';
import {IntlProvider, intlShape} from 'react-intl';

const intlProvider = new IntlProvider({locale: 'en'}, {});
const {intl} = intlProvider.getChildContext();

export function shallowWithIntl(node, {context} = {}) {
    return shallow(React.cloneElement(node, {intl}), {
        context: Object.assign({}, context, {intl})
    });
}

export function mountWithIntl(node, {context, childContextTypes} = {}) {
    return mount(React.cloneElement(node, {intl}), {
        context: Object.assign({}, context, {intl}),
        childContextTypes: Object.assign({}, {intl: intlShape}, childContextTypes)
    });
}
Testing events
There’s one other major feature of enzyme that we haven’t shown in these examples: event simulation. Enzyme allows you to simulate events in order to test your event handlers. This can be done by finding the relevant item on the rendered wrapper object, then using the simulate() method to trigger an event, and using toBeCalled() to assert that the appropriate handler is called. The previous example test could thus be rewritten as follows:
test('should call onModalDismissed callback when the modal is hidden', () => {
    global.window.mm_config = {
        BuildEnterpriseReady: 'false',
        Version: '3.6.0',
        BuildNumber: '3.6.2',
        SQLDriverName: 'Postgres',
        BuildHash: 'abcdef1234567890',
        BuildDate: '21 January 2017'
    };

    const onHide = jest.fn();
    const wrapper = mountWithIntl(
        <AboutBuildModal
            show={true}
            onModalDismissed={onHide}
        />
    );
    wrapper.find(Modal).first().simulate('hide');
    expect(onHide).toBeCalled();
});
Conclusion
Component tests provide an easy way of unit testing React components, ensuring consistency in their rendered output, and enforcing a reliable, props-based API. As we move the web app codebase to Redux, the potential benefits increase dramatically, as almost all UI components will be fully testable in this way. Going forward, we expect to make component tests a requirement for all new (or refactored) UI components introduced into the Mattermost webapp in the near future, similar to how we already require test coverage for all server-side changes. You can keep see the Mattermost webapp’s component tests as they are added here.