Custom Slash Commands in Mattermost with AWS Lambda and API Gateway
Thu, Aug 24, 2017Mattermost comes with a number of built-in slash commands, such as /join to join a channel, or /away to set your status to away. It also supports Slack-compatible custom slash commands. These offer a simple way to add custom commands that help to make your team’s workflow fast, efficient and enjoyable.
Custom slash commands are actually very easy to build. You just need to set up an HTTP endpoint which will receive the command payload, processes it and respond with the message which will be posted. Then add the custom slash command to the server and point it at your HTTP endpoint and you are done.
The only inconvenient part of building a custom slash command is making the HTTP endpoint available. The obvious way to solve this is to set up a webserver somewhere to host it, but this is a lot of overhead for an endpoint which might only triggered a few times a day. However, this is somewhere where serverless execution environments like AWS Lambda really shine, making it simple to set up, without needing a web server, and costing a few fractions of nothing for a lightly used endpoint.
In this post, we will walk through setting up a Mattermost Custom Slash Command hosted as an AWS Lambda function in combination with an AWS API Gateway endpoint.
The Lambda function we write is going to be written in Python 3, although you can use any of the other supported languages if you prefer. As an example, we’re going to use the /standup command the Mattermost Core Team use to post our progress update in our channels each day. If you’d like to see what this command looks like now, jump ahead to the [See it in Action] section below.
Setup in AWS
We’ll start by setting up the Lambda function and API Gateway endpoint in AWS.
- Log in to the AWS console and go to the Lambda section, and click on Create a Lambda function.
- On the Select blueprint page, click the Author from Scratch button.
- On the next screen, select API Gateway as the trigger.
- Fill in the new set of settings which appear:
- Pick an API Name (e.g.
MattermostSlashCommands) - You can leave the deployment stage as
prod. - Select Open for the security. This means your API can be invoked over HTTP without any credentials.
- Pick an API Name (e.g.
- On the next page, fill in these settings too:
- Provide a name for your function. We’ll use
SlashStandup. - Choose Python 3.6 for the runtime.
- Select Edit code inline.
- For the function code, copy paste the code in the [Implementing our Slash Command] section.
- For the Lambda Function Handler, create a new role from template, and give it a name, e.g. runLambdaFunctionsRole.
- For RAM and Timeout, select
128mband30srespectively.
- Provide a name for your function. We’ll use
- Advance to the review page, and click Create Function.
- On the success page, you should see the URL for your new API endpoint.
Implementing our Slash Command
The full Python 3.6 code for the /standup Custom Slash Command is as follows:
from datetime import datetime
from urllib.parse import parse_qsl

import json

def parse_input(data):
    parsed = parse_qsl(data, keep_blank_values=True)
    result = {}
    for item in parsed:
        result[item[0]] = item[1]
    return result

def lambda_handler(event, context):
    # Parse the request
    try:
        request_data = parse_input(event["body"])
    except:
        return {
            "statusCode": 400,
            "headers": {"Content-Type": "application/json"},
            "body": "{}",
        }

    # Check the token matches.
    if request_data.get("token", "") != "YOUR MATTERMOST SLASH COMMAND TOKEN":
        return {
            "statusCode": 401,
            "headers": {"Content-Type": "application/json"},
            "body": "{}",
        }

    # Build the response message text.
    text = "##### Status Update for {}\n\n{}\n\n#standup-{} #standup".format(
            datetime.strftime(datetime.now(), "%A %-d %B %Y"),
            request_data["text"],
            datetime.strftime(datetime.now(), "%Y%m%d"),
    )

    # Build the response object.
    response = {
        "response_type": "in_channel",
        "text": text,
    }

    # Return the response as JSON
    return {
        "body": json.dumps(response),
        "headers": {"Content-Type": "application/json"},
        "statusCode": 200,
    }
Let’s go through this bit-by-bit, looking at how it works:
def parse_input(data):
    parsed = parse_qsl(data, keep_blank_values=True)
    result = {}
    for item in parsed:
        result[item[0]] = item[1]
    return result
The parse_input() function parses the form-encoded data sent by Mattermost in the POST body when it calls our API endpoint into a dict for easy access to the parameters that have been passed.
    # Parse the request
    try:
        request_data = parse_input(event["body"])
    except:
        return {
            "statusCode": 400,
            "headers": {"Content-Type": "application/json"},
            "body": "{}",
        }
Before we do anything else, we parse the payload we were sent by the Mattermost server. If this fails, we return a HTTP Bad Request response.
    # Check the token matches.
    if request_data.get("token", "") != "YOUR MATTERMOST SLASH COMMAND TOKEN":
        return {
            "statusCode": 401,
            "headers": {"Content-Type": "application/json"},
            "body": "{}",
        }
Next, we check that the token parameter in the request payload matches the one we have hardcoded in the code. By hardcoding the token provided by Mattermost when setting up the custom slash command, we can ensure that our API endpoint rejects any requests that do not come from our Mattermost server, returning a HTTP Unauthorized response in this case.
    # Build the response message text.
    text = "##### Status Update for {}\n\n{}\n\n#standup-{} #standup".format(
            datetime.strftime(datetime.now(), "%A %-d %B %Y"),
            request_data["text"],
            datetime.strftime(datetime.now(), "%Y%m%d"),
    )
Now we have the payload of the request, and have ensured the request is coming from our Mattermost server, we can construct the text of the response message.
    # Build the response object.
    response = {
        "response_type": "in_channel",
        "text": text,
    }

    # Return the response as JSON
    return {
        "body": json.dumps(response),
        "headers": {"Content-Type": "application/json"},
        "statusCode": 200,
    }
Finally, we build the response object to send back to the Mattermost server in the JSON format it expects, setting the response_type to in_channel so the message appears in the channel for everyone to see. Then we dump it to a string and return the response object for API Gateway to process and return to our Mattermost server.
Configuring Mattermost
The final part of the process is to add a new Custom Slash Command in Mattermost. Depending on the policy settings on your Mattermost server, you might need to be a System or Team Administrator to do this.
- In the Mattermost web app main menu, select Integrations, then Slash Command then Add Slash Command.
- Fill in the form as per the screenshot below (making any changes you would like). The most important are:
- The Command Trigger Word which dictates what
/wordyou use to trigger invoke the slash command. - The Request URL, which should be the URL for the API endpoint on AWS API Gateway/Lambda we created earlier.
- The Request Method, which should be
POST.
- The Command Trigger Word which dictates what

Once that form is filled in, click Add and you you will see the Token for the slash command. Use this in the Lambda function code described earlier to ensure that only your Mattermost server can call the lambda function.
See it in Action
We’ve built the Slash command on AWS, and added it in Mattermost. Now all that remains is to try it out.
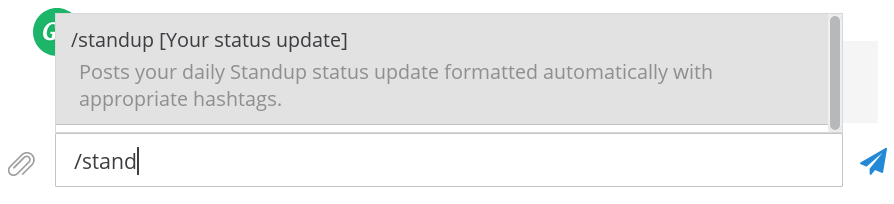
Start by typing /standup into the message box of Mattermost:
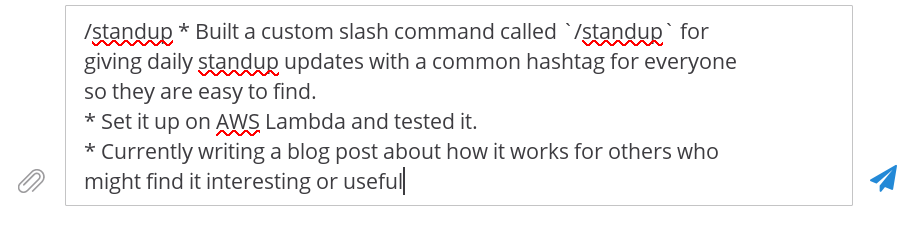
Finish typing the command name, or click on the autocomplete suggestion to finish it for you. Then type in the rest of your status update:
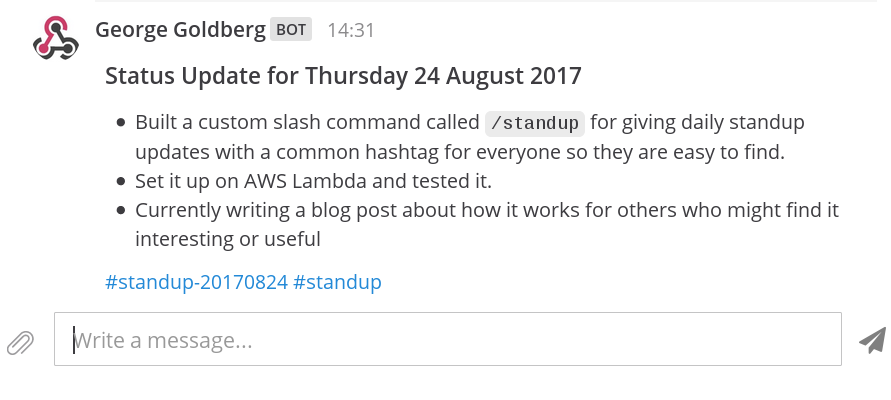
When you are done, press return, and if everything is set up correctly, you’ll see your status update post appear in the channel:
And that’s it really. You can customise the slash command to do whatever you want by changing this code. You can see a list of parameters that are sent by the Mattermost server when calling your API endpoint as well as a list of parameters it accepts in the response for more inspiration in the Mattermost custom slash command documentation.